
 A very close friend of mine bought a house a few years ago in a mostly rural part of the country. It had been purchased previously as a flip but the other owners defaulted and my friend, I'll call her Bunny, bought it, mostly finished, from the bank. Bunny and her husband are handy enough that they were able to finish the little things that were still left, like trimming the closets. Both the front and the back of the house have decks, the back one is nice, with a railing, and large enough to entertain. The front one? Well, I love Bunny but it was an eyesore. At some stage (pre-purchase) the railings were taken down and the steps removed. The planking had a chevron pattern, a fav of mine, but there were weird cut-out sections where the planks ran parallel to the house. It was large. Very large for a front deck and had trellis slapped on the front, at some better time, painted white. They have a substantial setback from the street, so the deck only looked weird up close. It overwhelmed the front of the house. Bunny loves to garden and is very creative and good at it, but landscaping around the deck seemed futile. They had stopped using the front door since the back door was as convenient and safer. Bunny's husband, father and father-in-law had all taken tools of destruction to this deck, pulling planks and seeing what might be done with it.
  They discovered a woodchuck living underneath and maybe wild rabbits. When asking me for advice on what to replace the front deck with, I suggested that if the structure was sound, it could be cut down and reused into a much smaller front door landing. This was the route they took. Since it would be easier to see for myself and lend a hand, off I went for a weekend. I will admit, Bunny recently had a baby boy and I really wanted to meet and play with him, ulterior motives.
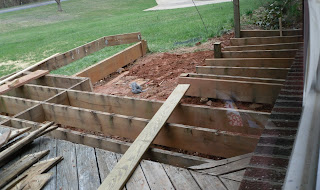
 The interesting thing about this deck is that it was a bit overbuilt but then they cheaped on other things. The joists are 2X10, very large for a structure only 24" off the ground (meaning using more posts wouldn't be unusual, then use 2x6). The beam supporting the joists was about 10' from the house, with about 6' of cantilever, which was why they used such large stock. The chevron design was probably an afterthought since the joists were 16" OC, standard for a chevron is 12" (I designed the CA deck with a chevron pattern and the joists were properly spaced, I looked it up). The planking was the standard 5/4 x 6" treated but it had never been sealed or painted and had warped, cracked, and discolored. Those planks are going to be recycled into raised garden beds so they're being removed with care. The ledger (beam attached to the house that the whole deck hangs off of) was only bolted once every two feet and had no flashing. I've always used two lag screws set vertically between every other joist, but it seemed secure. Since it's attached to brick, maybe there's no need for traditional flashing but a good bead of silicone would keep the water from getting behind the board and causing problems. There was a funky space between the ledger and front door threshold that we decided would be sealed with insulating foam and proper flashing. Thankfully, there were no crazy surprises, like the rotted walls in my master bath, so after one day of work, we had the deck to a place where bunny's husband could continue on his own. We chose the joists to keep and cut them to 5' long. Removed the end joist, which was improperly installed and about to fall off anyway, recut and rehung it with a corner brace for good measure. Using a circular saw, the other end of the ledger was cut in two places and we removed a chunk so the other end joist could be installed. Once the depth of the deck was established, we realized it was only 15" or so from the deck surface to the ground. It was decided that a separate step would be built after the ground was leveled a bit, being installed on precast cement footers sunk into the ground. The deck itself would be supported by posts though and I let bunny's hubby have the joy of digging the holes. He did three, one on each corner and a center one. The deck ended up 8' wide so having three posts was probably overkill (that word again!) but, hey, that seems to be my MO. The only real glitch was when the first hole was being dug, a cement block was in the way. No problem, dig it out and continue, right? After way too much digging, Bunny's hubby discovered it was multiple blocks, cemented together, at least 24" deep. The solution was to remove the end joist and move it over 5" making the deck less wide but clearing the cement blocks. Everything was leveled, plumbed and perfect and we stopped for the day. The intention was to get the end board installed and the deck bolted to the posts and ready for planks the next day but we were foiled by rain. I left that day after assurances the rest could be done without me.
There's a ton of work to still be done before this deck will be ready for flower pots and stain, like removing the old deck and picking out all the rubbish that was tossed under the old deck.
We found a fork, a submarine and other toys, cement blocks, rocks, and general trash. Bunny and I went to Art school together and we both have the imagination to look at the scary state the front it currently is in and see a cute deck with planters on both sides, specimen trees and beautiful plants along a welcoming rounded path to the front door. The reality is it might take a couple of years (for the landscaping) but imagination is a serious motivator.
There are many good books on deck building, giving spacing for joists and posts and beams depending on the wood available locally -yellow pine, doug fir, etc- I highly suggest using one as a reference if building a deck. The first deck Wino and I built was at ground level but I still used 4 different books as reference.
we have same deck, I also replaced it's component because it's not strong anymore. I did deck waterproofing at my little terrace in the second floor also for the rainy season.
ReplyDelete