
 Is that a word? Peptoing? I've just finished the third coat of pepto on the shower floor and as I wait for it to dry (1 1/2 to 12 hours, ugh) I figure I'll make use of my time. After the shower base went in and the walls went up, the shower walls were ready to go in. Here's something very important when creating a waterproof shower stall- behind the durarock cement board, 6 mil poly should be hung, overlapping the flange at the bottom where the wall and shower pan meet. I did not know that water will migrate through grout lines, then cement board, to then soak the studs and insulation behind it. I think this is an extreme example but a little cheap poly sheeting is a good insurance policy. We had some left over from using it as a vapor barrier behind the drywall in the basement so up it went. I had read online that hardibacker shouldn't be used for shower walls so we used the 1/2" durarock. Since it's only available in 3' x 5' sheets now, we had a few seams, which I sealed with the same high quality 100% silicone caulk. Same for the corners and where the wall meets the base. Because of my water paranoia, probably caused by the sight of the disintegrating studs in the shower, I decided to see if I could waterproof the shower base more. The website that sells the base had a paintable product called "ShowerSeal" which seemed perfect but really expensive so I searched for an alternate product. I came upon a product called "Pro-Red", which is a water-based (easy cleanup) paint on membrane that at one layer, provides a surface for mortar to grip to and prevents tile cracking and at thicker applications, creates an elastomeric waterproof membrane. The importance of being "elastomeric" is so any shifting or settling that always happens in houses causing small cracks in corners will not crack this membrane (within reason).
 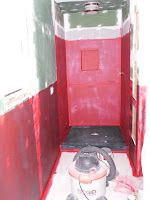 Sold in 2 or 5 gallons, it was expensive, then shipping added $40!! I found a product called "Red Guard" sold at the HD in the flooring department that I think is the same stuff, just packaged for non-professionals. All of the instructions and descriptions are exactly the same as the Pro-Red, but it's packaged in 1 and 3 gallon sizes. Plus, no shipping! When you open the bucket, it's a lovely pepto-pink with a strange pasty consistency. I applied one layer to the drywall outside the shower that was going to be tiled for the wainscoting. I applied it thicker (three layers) on the shower walls. This took a few days because of the dry time between coats. The instructions say for waterproofing the wet layers should not be more than 125 mils thick. Huh? More searching on the internet and I figured 125 mils = 1/8" thick. Ok, now I have an idea of how this goes on. As it dries, it turns a lovely, dark red color, hence the name. Juxtaposed with the green drywall, and the bathroom was holiday festive!
The Red Guard label said it it could also be used to waterproof around the closet ring on a toilet and I took that to heart. The original toilet closet ring ended up almost level with the completed sub floor, so tiling the floor would put it 1/4" or more below the surface. Hmm. Wino found an adapter closet ring just for this problem (at HD, of course), that has a gasket and slips into the old closet ring, with the new closet ring resting on the subfloor.

In the picture, Wino used mortar to fill in around the old ring, making it level with the subfloor and I've waterproofed it so the new ring can go in and get screwed down. The Red Guard states it will stick to drywall, metal, PVC, and cement/mortar. The point of this, in theory, is to give any water that might be leaking (which happens when wax rings get old) no place to go except out from under the toilet, alerting any observant person to the problem. Usually, the leak just soaks the sub floor around the ring, slowly rotting it away until it starts to drip from below. This can go unnoticed for a long time, meaning much more major repairs. (Also note the "baseboard" tile along the wall in this photo)
 As to tiling the walls, I used greenboard drywall (the stuff made now has mold treatment in the plaster, not just wax on the paper surface, I asked) and with the Red Guard, was able to tile directly on it using modified thin-set (not the pre-mix stuff!). This saved us serious time and some money in not having to use hardibacker for the wainscoting and drywall above it. It's not in a wet area so there shouldn't be any problems, but behind where the sink will be, I did used scraps of hardibacker we had from the floor. This also got three layers of the Red Guard, since it will be seeing some water in the future. I did not tile behind the sink vanity, since it'll be hidden. I stole an idea from TOH magazine in which this couple used subway tile turned on end to mimic a base board. Clever! I then ran a strip of glass tile, then the subway tile in a brick pattern, then the glass, then bull nose. I'm quite happy with the result.
I think when I do this again, since there will always be other bathrooms, when laying the tile, instead of starting from one corner with full and half tiles, I'll start in the center so the ends of the walls have even partial tiles. That would look better. Oh, and I'd tile the floor first, then work on the walls. I'm sure there's a reason we did the walls first but I'm not clear on why. The shower base has gotten a little beat up with all the work done in that area. It's fine, but if it had been tiled, it would've been better. And when tiling, I always back-butter every tile. This means applying a thin layer of mortar to the back of the tile in addition to the mortar on the wall or floor. It makes the job longer and takes more attention but I've never had a tile pop off or crack.
As to tiling the walls, I used greenboard drywall (the stuff made now has mold treatment in the plaster, not just wax on the paper surface, I asked) and with the Red Guard, was able to tile directly on it using modified thin-set (not the pre-mix stuff!). This saved us serious time and some money in not having to use hardibacker for the wainscoting and drywall above it. It's not in a wet area so there shouldn't be any problems, but behind where the sink will be, I did used scraps of hardibacker we had from the floor. This also got three layers of the Red Guard, since it will be seeing some water in the future. I did not tile behind the sink vanity, since it'll be hidden. I stole an idea from TOH magazine in which this couple used subway tile turned on end to mimic a base board. Clever! I then ran a strip of glass tile, then the subway tile in a brick pattern, then the glass, then bull nose. I'm quite happy with the result.I think when I do this again, since there will always be other bathrooms, when laying the tile, instead of starting from one corner with full and half tiles, I'll start in the center so the ends of the walls have even partial tiles. That would look better. Oh, and I'd tile the floor first, then work on the walls. I'm sure there's a reason we did the walls first but I'm not clear on why. The shower base has gotten a little beat up with all the work done in that area. It's fine, but if it had been tiled, it would've been better. And when tiling, I always back-butter every tile. This means applying a thin layer of mortar to the back of the tile in addition to the mortar on the wall or floor. It makes the job longer and takes more attention but I've never had a tile pop off or crack.
The tiling looks great - love the glass tiles!
ReplyDelete