
 Yesterday the A/C service guy came out for a spring tune up of the A/C. He's familiar with the house, he came out a few months ago when the heat pump decided to give up the ghost during a snow storm. It ended up being not the heat pump but the circuit breaker. (just an aside, if something keeps tripping a breaker, don't just keep resetting it, eventually it will melt and the whole panel will need to be replaced). The breaker panels (yes, plural) are in the basement and unfortunately, I was in the process of finishing the basement when all this happened. The half flight of stairs to the basement were scary. The only saving grace was with only 6 steps, you could jump to the bottom easily were a step to give way. I knew this was a problem when, just weeks after buying the house we had the chimney sweep come out. The helper was a big boy and I saw one of the steps flex about two inches as he came down to prep the stove insert in the basement. That's just not right. He kept going up and down the stairs and I was sure I was going to be pulling him out of the staircase with a broken leg (really, I would have just been tugging at him, he was so big there was no way his boss and I could have lifted him, even in a Lou Ferrigno moment) Suffice to say, I knew the stairs were a problem. After finishing the walls and floors of the basement, I procrastinated as usual about the steps. I had only built steps for decks, specifically the house in CA and the steps were such a pain, I was not looking forward to fixing these. Finally, while trying to avoid a different project, I demo'd the steps. I'm not sure what the codes are for steps but I'm pretty sure having two finish nails holding each end of the board horizontally with no under-structure might not make the grade. The half wall of the steps was also pulling away so there were gaps between the tread and the walls of about 1/2" on each side. You could see the nails but I didn't think that was the only thing holding the stair tread up! The weight of the board, person stepping and the force of that step were held up by just those two nails. I still can't believe it when I write it again. It took about 20 minutes with the sawsall and the steps were out. I left the risers, they seemed fine and I faced them with the laminate matching the floor.
 I wasn't sure how to proceed with the structure to hold the tread so I just built it like decking. I made boxes out of 2 x 4 and secured them level with the top of the risers using 3" screws.

It was a bit of a pain to position the boxes (which were heavy) and try to screw them in and keep it level side to side and front to back. Clamping them to the risers and drawing guide lines helped. Once that was done, I could at least climb the stairs, being careful. The cats thought it was great, they could get underneath the stairs, which at some point harbored critters (like any basement in a cold climate), and that was worthy entertainment.
Since the basement floor is 'oak' laminate, I used oak stair treads. HD and Lowes both have them for about the same price. I took a sample of the laminate and matched the stain color so I could stain the boards to match. Before installing anything though, I painted the side trim on the steps so I wouldn't have to do it after the steps were installed. This saved time in the end. I also stained and sealed the treads before installing them, letting them dry for a good four days. Using a nail gun with 2" finish nails, the treads went in fast (I numbered them on the back when I cut them since they had to be fitted), filled the nail holes with putty and eventually put a final thin coat of urethane over the existing 3 coats. They are solid. The dogs will even use the steps now, before they were too freaked out by the shakiness of them.
The A/C guy, making small talk, says "I see you finished the basement,

it looks nice. The steps are much better". I laughed since ANYTHING would be better than what was there. He said he had just rebuilt the basement steps in his house too so we compared notes on what we each did. After explaining how I did ours, he said "wow, that's kinda over-kill, don't cha think?" Hmm. Maybe.

 Once I laid the mat out and cut the mesh where needed, I realized it was going to be one row short, which sucks because that means a cold spot. So I was creative with the purple wire and hot glue, the result can be seen in the photo. I also ended up putting down one layer of the pepto on the floor as an anti-fracture membrane underneath the mat. I know that cracking is probably not an issue with the small tiles that we used but I had it and it only took 20 minutes (and allowed me to put off laying the mat for another day) and who knows with the heating and cooling of the floor? The vanity is along the same wall as the toilet and you don't want the mats under those so that's the unheated space along the inside wall.
 used some scrap wood to make another, more useful jig (see pic) and it really worked better. I also held a smaller piece of moulding in place on the wall and traced the bottom edge, matching the corners so I'd have something to follow once ready to nail them in. Since walls are never straight or perfectly square, I had to re-cut some of the ends when installing, adjusting the angle on the saw. I always cut the first time a little big, exactly for this reason. If the angle is right, the overlap or gap will be uniform. If not, it's an easy indication of where to cut. Being winter and very dry in the house (25% rel. humidity), I let the moulding acclimate for a few days before the install, and I didn't worry about little gaps at the corners. I caulked the corners because come summer, the wood will swell and the caulk will adjust, whereas, with wood fill, it'd end up pushing the fill and then when the humidity comes back down, you'll see cracks in the corners again.

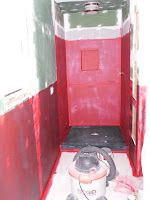 Sold in 2 or 5 gallons, it was expensive, then shipping added $40!! I found a product called "Red Guard" sold at the HD in the flooring department that I think is the same stuff, just packaged for non-professionals. All of the instructions and descriptions are exactly the same as the Pro-Red, but it's packaged in 1 and 3 gallon sizes. Plus, no shipping! When you open the bucket, it's a lovely pepto-pink with a strange pasty consistency. I applied one layer to the drywall outside the shower that was going to be tiled for the wainscoting. I applied it thicker (three layers) on the shower walls. This took a few days because of the dry time between coats. The instructions say for waterproofing the wet layers should not be more than 125 mils thick. Huh? More searching on the internet and I figured 125 mils = 1/8" thick. Ok, now I have an idea of how this goes on. As it dries, it turns a lovely, dark red color, hence the name. Juxtaposed with the green drywall, and the bathroom was holiday festive!
 As to tiling the walls, I used greenboard drywall (the stuff made now has mold treatment in the plaster, not just wax on the paper surface, I asked) and with the Red Guard, was able to tile directly on it using modified thin-set (not the pre-mix stuff!). This saved us serious time and some money in not having to use hardibacker for the wainscoting and drywall above it. It's not in a wet area so there shouldn't be any problems, but behind where the sink will be, I did used scraps of hardibacker we had from the floor. This also got three layers of the Red Guard, since it will be seeing some water in the future. I did not tile behind the sink vanity, since it'll be hidden. I stole an idea from TOH magazine in which this couple used subway tile turned on end to mimic a base board. Clever! I then ran a strip of glass tile, then the subway tile in a brick pattern, then the glass, then bull nose. I'm quite happy with the result.


 the walls were out and it was just a raw space. Now I could really think about what I wanted it to be. One thing was for sure- heated floors!!!! I've always wanted them and now that we're living in the arctic circle (ok, but it feels like it sometimes) warm floors on my bare feet is a no-brainer. I asked Wino what would be on his wish list and he really wanted two sinks. Boy wants to brush his teeth without having to move for me to spit. There's love. Two sinks would be a challenge for this space but I was willing to negotiate. I wanted a larger shower than the solitary prison cell that passed for a shower stall before. Basically, I needed the bathroom to be twice as big. My inability to bump out the exterior wall (the electric meter is on the other side, can of worms) forced me to think creatively.
 I reclaimed some storage space inside the walls by recessing cabinets where I could. The interior wall has a bump-in next to the toilet which looked weird so we added more recessed cabinets to make the bump-in look less awkward. This photo shows the framing for those cabinets. These will have to be custom made, of course. The plumbing for the shower was left as-is until a decision was made on what exactly was going to happen there. It did look funny having the shower head sticking out of the open wall. On the exterior wall, the only change I made was replacing the insulation with R-19 (it was R-11). I had to add some studs so the shower door would have good purchase when it finally gets installed. I researched radiant floor heat (electric) and found a very good deal at Costco online, including a programmable thermostat. In the photos, the sub floor has been installed- 3/4" plywood over the 1/2" original sub floor, then 1/4" cement backer board over that to take the tile. I've always wanted a bathroom with tile wainscoting too so I intend to do it here. Did I mention our budget for the entire bath is a mere $5k?