Tuesday, April 27, 2010

Recycling Old Hinges and Hardware

In recycling our old ugly doors into much better looking ones, one of the mini-projects was to paint the hinges. I have developed a method for rehabbing metal fixtures and hardware that works pretty well, looks good and saves money. The reason for reusing the hinges was that installing new hinges would be a pain in the ass, but it always looks nice if the hinges match the other door hardware. In the house in TX, the original door and hinge hardware was a vintage oil rubbed bronze. Right now, this finish is very popular and it's one I like and use often. In adding new vintage doors and restoring the others that had been "updated" I refinished glass or porcelain knobs I purchased at a salvage yard.

The best way to match another color is to layer similar colors. I learned this technique at the Los Angeles Opera, dying character shoes to match fabric swatches. I'd spend the day taping off the soles and buckles, then sit outside on the loading dock with 20 cans of different colored spray shoe dye, layering the colors until it matched the swatch. If it got too heavy looking or thick (it might crack with wear), I'd start over by removing the dye with acetone and trying different colors. This same method works with any metal fixture or hardware. Here's the general steps:

Clean the piece you want to paint. I use soapy water if it can but light fixtures or anything electrical should only be wiped down. Sometimes really old stuff that's been sitting in a garage or shed takes a little elbow grease to clean but it's imperative that any oil, dirt, or flaky paint is removed.

Many newer fixtures and hinges will have a clear coat on them that needs to be removed. Even if it doesn't, this step is important. Using no less than 220 grit sand paper (400 for metal is best but i'll use what's on hand) gently sand all of the surfaces that will be painted. A lot of times, brass will turn silver colored, that's fine, it means the finish is roughed up enough. Getting every surface can be a challenge on fixtures with decorative stamping but wrapping the tip of a pencil in the sand paper can help get at those tough spots.

I'll usually wipe the piece down with mineral spirits to get rid off all the dust, then tape off anything that doesn't want to be painted. This part is very important to how the finished product will look so the tape needs to be perfect. I use blue painter's tape, mostly because it's what I have but masking tape also works. Clear packing tape does not work. Tried it in a pinch, huge mess.

Use a primer made for metal for the first coat. If the finish color will be dark, using grey or red primer is fine but use white for anything in the silver/chrome family. I use whatever can still has paint in it. Painting technique is important here so don't rush it and if it looks bad, use mineral spirits to remove the paint that's been applied and start over. In a well ventilated area, spray in light coats, pressing and releasing the spray tip when not pointed at what's being painted. This means pointing just above or next to the piece, start to paint, sweep across the piece and release the tip once past the piece. It sounds hard but it's really easy with a little practice.

Follow the directions on the can about dry times. I always try to read this in the store before buying because each product is so different. I once bought a primer that took 48 hours to recoat. What a pain! An afternoon project took a week. Anyway, after the primer coat, apply a light coat of the next color. To do the hinges, I used a semi-gloss brown I had from another project. Two light coats and the primer was covered. The next paint I used was a "hammered metal" paint. If this is applied lightly, it gives just enough texture. I didn't want to cover the brown, just dust it since the hammered metal paint was a little too grey/brown. If it looks too light after that, a dusting of the first color or even black can give nice texture. The additional coats don't want to be completely uniform because you want the underneath colors to show through, mimicking tarnish and wear of an antique finish.

If you're painting something
that will be installed with screws that will show, the heads of the screws can be painted too. Care should be taken when installing the screws so as to not strip the paint. I drill holes in a scrap of wood and set the screws upright in it and paint them as I paint the other objects.

Once happy with the look of the piece, a durable clear coat is important. Even with a clear coat, if the piece is in a high traffic area, it might get scratched, so this method is better for things that don't get handled. I once painted a brass metal door knob to match other vintage ones and it looked great until I turned it with my keys in my hand and left a beautiful brassy scratch along the top. Clear coat can only do so much.

This is a great way to recycle what's already in the house, especially if the design is beautiful, just not the finish, or it's something that's a bit tired looking. And for the hardcore- dents, gouges or rust damage in the metal can be patched with Bondo and sanded. Bondo can be found in small tubes (or gallon size tins) at any automotive supply. Sanded with 400 grit, you'll never know the damage was there. This is great to use when repairing instead of replacing.

Monday, April 26, 2010

Replacing an Ugly Door with a Fire Door

This is the first house I've owned that has an attached garage. In having the garage attached, the door between the house and the garage needs to be a steel 20 minute-rated fire door for it to be code. Ours is a lovely, brown, hollow-core door with a peephole. The peephole is just weird but did make it obvious if the lights were left on in the garage. The door fit fine but had air gaps all the way around when closed. I was once doing laundry and heard this long whoosh sound and realized it was the door, exhaling our precious heated air into the cold garage. Even in the dead of winter, the garage never seemed to get much colder than 55 degrees, now I knew why. Wino solved that problem with more weather stripping than door. After that, the door needed to be slammed, not once but twice to get it to latch. Sometimes, when it's nice out, I wouldn't even bother latching it. Too much trouble, and it threatens to knock over lamps and such in the living room above it. This situation needed to be fixed and I knew we really needed to just put in a fire door but, even though I have replaced many doors, I had only installed one pre-hung door; double french doors into a new opening at the CA house. It had been a while and we didn't have to sort out someone else's messy rough-in. I wanted to make sure that having the door missing for an entire day wouldn't be a problem, like say, doing it during the winter would suck all the heat out of the house. I mentioned this to the HD door guy who said "well, installing a pre-hung door shouldn't take more than 30 minutes!". I just looked at him, smiled and nodded. He's never worked on OUR house. We bought the door a few weeks ago at Lowes, their price on the same door was about $40 cheaper than HD but they only had a few (new item for them) and only one in the right size and handing (which way the door opens) so we bought it that day. Go in for drawer glide, come out with fire door. Sounds about right. Each following weekend, there were things to do, people coming out to visit, other more pressing projects. This was not something I was willing to try by myself, if only because of the thought of trying to hold a door plumb and square, keep it from falling out the hole, then putting screws in it. Well, waiting until Wino had a few free hours seemed like a better idea.

Putting in a pre-hung door, in theory, is much easier than replacing just the door and having to fit the hinges and door to an existing finished opening. Tearing out the old door and the jambs wasn't bad, we used a recip saw and cut the nails holding the jambs in place. It was a little awkward because of how close one side is to some cabinets but it got done in short order. A little cleanup, check the plumb of the rough opening and we're ready to go. We dry fit the door first and realized the brick molding on one side had to be removed and the top corner of molding cut down because of those pesky cabinets.
The molding on the outside basically lets you just push the door all the way in, then you can open the door, plumb and level the sides, shim and put in the screws. If the molding is missing on the hinge side, like in our luck, when you open the door to get the jambs to level and plumb, the weight of the open door slowly tweaks out the bottom, the top tweaks in and twists the whole thing. Especially if you aren't paying attention to it because you're trying to make the other jamb perfect. Aaargh! Ok, lets install the hinge side first. Smart. That side's in and I get the little level to check the threshold because the other side wasn't behaving and -what? Is there supposed to be cardboard under it? Crap! Out comes the door, we apparently missed the stealthily placed cardboard that protects the underside of the threshold. Ugh. I had put silicone all along the threshold so it was a gooey mess. No wonder it was off, there were staples sticking out on one side. So we clean up that mess but before we can put the door back in, Wino decides we need proper shims. We were using scraps of wood which admittedly were not the easiest thing to use but he says shims would make everything easier. Oh, is that what would make the install easier? Goodie! So off he goes to Ace for shims and I decide it's time for lunch. Being that it was 10 minutes to 5 on a Sunday evening- crap! late lunch- the Ace was closed and so were the other stores he tried, not willing to drive to Lowes or HD just for shims. So after wasting about an hour looking for shims, Wino came home and made shims himself with wood scraps and the chop saw. There comes a time in all projects where I've learned to just nod my head and move forward. Following the directions that came with the door, we trued up the hinge side and put "temporary" screws in to hold the whole thing together and I left to walk the dogs. Wino finished the screws on the other side, and when I returned, I stuffed some insulation into the gap overhead, hastily installed the deadbolt and latch and called it a night.

The next day was spent re-installing the trim around the door, which oddly did not just go back up. Two tubes of caulk later and I felt the door was relatively weatherproof. Well, until I shut the door standing on the outside with the light on inside. Major gaps from the latch up to half way overhead. It took some adjusting of the strike plate for the latch but it now closes tightly with no gaps, but you still have to pull it shut a bit. It still needs the nail and screw holes patched and the trim and door painted- the door comes primed in grey. All that is a project for another day when I'm avoiding a different project and I can leave the door open for at least several hours.

Wednesday, April 21, 2010

The Spa-worthy Bathroom is Finished!

The best motivator for projects is a visit from family or friends. Last weekend my mother came out to visit to help sort out the garden -I despise gardening but like the romantic notion of going out into the garden to gather fresh veggies and herbs for dinner- so the week prior, I made a real effort to finish up what was left to do in the master bath.

Wino did a really nice job grouting the entire bathroom floor, which I really appreciated but since Wino was at work during the week, I had to man-handle the shower door myself. The glass door is huge, awkward, and heavy so I moved it by propping it on the toes of my boots and scooting it across the room into the bathroom. Fun. I thought I had purchased the 6mm glass but apparently, I bought the 10mm glass which basically means it's heavy as hell but looks even better. The directions were less than stellar with misprint numbers and strange sentence formation making it a challenge. I had expected it though since I bought a different shower door from the same company for the master bath in TX, and had the same issues. We cheated a little on the shower head and purchased the same shower column that we had in TX.
Wino really liked it and I was unable to find anything comparable for less money. It has a separate dial for water temperature that allows you to turn the shower head on and off without having to readjust the hot/cold mix. This is good in summer when washing hair or shaving legs. It also helps to conserve water. The body jets on it are a bit of a joke, but having the separate handheld shower head is nice. The install was easy, mostly because we were familiar with how it gets installed and were able to prepare the water lines coming out of the wall. Installing it in TX was a real trial but at least we had the learning curve for here.

We went with a basic but stylized 1.6 gallon flush toilet. Because of the size of the sink, the tank needed to be more narrow than traditional toilet tanks and this fit nicely. Wino installed it in one evening but I had forgotten the flexible water line for so it sat useless for a few more days. One thing I learned when looking for a toilet was to check the MAP rating, this is flush power and tops out at 1000. Most new toilets today are rated very high but the cheapie toilets are not. I also would have preferred the round front toilet instead of the elongated but ordering it was just not an option this time. We went to buy a toilet and were determined to come home with a toilet.

The sink was the last thing to go in since I was building the cabinet for it to sit on and had been slacking off on that project.
I still haven't built the drawers but at least I got the sink in and working. Figuring the water lines should have been easy but the "plumbing expert" at HD had me buy the wrong splitter valve but a different associate sorted it out for me. The faucets we bought also were a little different from what I've installed in the past but we really liked them and they were an awesome price. The sink went in relatively easy, but again, Wino was at work so I had to lift, carry and place this monstrosity alone. My biggest fear wasn't that I'd throw out my back but that I'd trip and drop the sink or whack it on the doorway or something and chip it. My luck held and the sink went in ok. It's actually bolted to the wall so the cabinet is mostly decorative, but it does take a little weight.

As much as I'd like to say the bath is totally finished, it's not and won't be for a while. All the little things at the end of a big project are the hardest to finish. Also please note that the links for products are just to give the product info, I don't think it's where I actually bought them from. I got much better deals and paid way less than what the list prices are now. I purchased most of the big stuff for the bath right before xmas and was able to really save with free shipping and holiday discounts.

With company coming this weekend for dinner, maybe I'll get the motivation to finish up the drawers for the vanity and the cabinet doors. Fingers crossed!


Wednesday, April 14, 2010

Cosmetic Surgery for a Poor, Ugly Door

I have ugly doors. It's true. All of them. Ugly. Brown. Hollow core. Shameful. It's something I didn't really take too much notice of when looking at the house initially but as it turns out, it bothers me. The last two vintage houses we lived in had really pretty doors, original to the
house, mostly. So I knew I would have to change out the doors. Easy, right? Well, if you've ever hung a new door in an existing opening, it's a bit of an art and a lot of a pain in the ass. One thing positive about our ugly doors is that they all work, open, close and latch without too much trouble. Oh, one would think 'isn't that just basic?'. Vintage houses rarely have doors that fit well unless someone else has gone through the trouble of making them fit and latch again. My point is, the doors are fine, functional, just ugly as sin.

In CA, we added a closet to the sunroom by building a new wall parallel to an inside wall. Just for fun (?!), I wanted to put a pocket door in instead of a regular door that would swing into the room. It was a huge pain, mostly due to the bizarre stocking practices of HD, but it got done (git 'er dun!) and we needed a door. I had my sources for vintage doors but I wanted something that would match the rest of the house (one lite or three lites) and not cost an arm and a leg with lots of rehab work to do. That's when I came up with altering a cheap prefab door to look like the rest of the doors.

This was my plan with the bathroom door. It leads from the master bedroom to the bath so I decided on glass panes with texture for privacy. Eventually all of the doors in the house will get done the same way but with solid panes instead. This cosmetic surgery works best on hollow core doors that are hung with removable pin hinges. Most older doors are like this. By popping out the hinge pins, you can remove the door without any tools (well, a screwdriver to help pop the pin) and rehang it quickly by yourself.
Using a sharpie and yard stick, I drew out three lites or panels on the door. Didn't like it so I tried four panels. Good! I cut out the panels with a circular saw and jig saw for the corners and was left with four big holes in the door. At this point you can see the guts.
If the door is solid wood, the next step is to put in the trim for the panels. My doors are hollow (see pic) so I cut strips from a 2x4 that would fit into the space between the door surfaces and secured them using a nail gun. Now the trim to hold the panels goes in. I chose to make my own on the table saw with scrap oak in a step pattern but I've bought quarter round profile trim at the home depot before and it works fine and is quicker. Figure how thick the inset panel will be and nail the trim accordingly. Only do one side then paint all the trim, including inside where the glass will sit.
I set the glass using painters caulk to stabilize it because glazing points would stick out too much. On this door, I used clear glass with a panel of textured plastic set on top to give a little privacy. It was a lot cheaper than buying textured glass and it gives a little protection to one side of the glass. Set in the panels and nail in the trim to hold it in place. I use short finish nails on one side incase I need to remove the trim to replace the glass panel. A few coats of semi-gloss paint and voila! a new, pretty door.

Using glass panels and adding wood structure makes the door heavier so it's a good idea to make sure the hinges are solid. I took off the hinges on the wall side to paint them and found they were installed with 1/2" screws. After painting, they were reinstalled with 2" screws. I chose to paint the hinges, which were spotty, tarnished brass, to match the new locksets, 'venetian bronze'. I will do another post on recycling hinges and fixtures by painting them, a favorite trick of mine to save time and money.

This is a great way to get custom-looking doors without the cost, or match a new door to vintage ones already in the house. This process can also be done to sliding closet doors to make them more useful, installing mirror in the panels. There are so many variations on this idea, one is only limited by creativity.

Tuesday, April 6, 2010

Building a Deck from an Eyesore

A very close friend of mine bought a house a few years ago in a mostly rural part of the country. It had been purchased previously as a flip but the other owners defaulted and my friend, I'll call her Bunny, bought it, mostly finished, from the bank. Bunny and her husband are handy enough that they were able to finish the little things that were still left, like trimming the closets. Both the front and the back of the house have decks, the back one is nice, with a railing, and large enough to entertain. The front one? Well, I love Bunny but it was an eyesore. At some stage (pre-purchase) the railings were taken down and the steps removed. The planking had a chevron pattern, a fav of mine, but there were weird cut-out sections where the planks ran parallel to the house. It was large. Very large for a front deck and had trellis slapped on the front, at some better time, painted white. They have a substantial setback from the street, so the deck only looked weird up close. It overwhelmed the front of the house. Bunny loves to garden and is very creative and good at it, but landscaping around the deck seemed futile. They had stopped using the front door since the back door was as convenient and safer. Bunny's husband, father and father-in-law had all taken tools of destruction to this deck, pulling planks and seeing what might be done with it. 
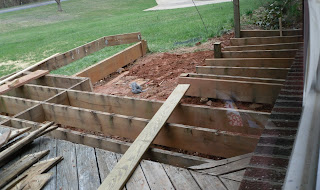
They discovered a woodchuck living underneath and maybe wild rabbits. When asking me for advice on what to replace the front deck with, I suggested that if the structure was sound, it could be cut down and reused into a much smaller front door landing. This was the route they took. Since it would be easier to see for myself and lend a hand, off I went for a weekend. I will admit, Bunny recently had a baby boy and I really wanted to meet and play with him, ulterior motives.

The interesting thing about this deck is that it was a bit overbuilt but then they cheaped on other things. The joists are 2X10, very large for a structure only 24" off the ground (meaning using more posts wouldn't be unusual, then use 2x6). The beam supporting the joists was about 10' from the house, with about 6' of cantilever, which was why they used such large stock. The chevron design was probably an afterthought since the joists were 16" OC, standard for a chevron is 12" (I designed the CA deck with a chevron pattern and the joists were properly spaced, I looked it up). The planking was the standard 5/4 x 6" treated but it had never been sealed or painted and had warped, cracked, and discolored. Those planks are going to be recycled into raised garden beds so they're being removed with care. The ledger (beam attached to the house that the whole deck hangs off of) was only bolted once every two feet and had no flashing. I've always used two lag screws set vertically between every other joist, but it seemed secure. Since it's attached to brick, maybe there's no need for traditional flashing but a good bead of silicone would keep the water from getting behind the board and causing problems. There was a funky space between the ledger and front door threshold that we decided would be sealed with insulating foam and proper flashing. Thankfully, there were no crazy surprises, like the rotted walls in my master bath, so after one day of work, we had the deck to a place where bunny's husband could continue on his own. We chose the joists to keep and cut them to 5' long. Removed the end joist, which was improperly installed and about to fall off anyway, recut and rehung it with a corner brace for good measure. Using a circular saw, the other end of the ledger was cut in two places and we removed a chunk so the other end joist could be installed. Once the depth of the deck was established, we realized it was only 15" or so from the deck surface to the ground. It was decided that a separate step would be built after the ground was leveled a bit, being installed on precast cement footers sunk into the ground. The deck itself would be supported by posts though and I let bunny's hubby have the joy of digging the holes. He did three, one on each corner and a center one. The deck ended up 8' wide so having three posts was probably overkill (that word again!) but, hey, that seems to be my MO. The only real glitch was when the first hole was being dug, a cement block was in the way. No problem, dig it out and continue, right? After way too much digging, Bunny's hubby discovered it was multiple blocks, cemented together, at least 24" deep. The solution was to remove the end joist and move it over 5" making the deck less wide but clearing the cement blocks. Everything was leveled, plumbed and perfect and we stopped for the day. The intention was to get the end board installed and the deck bolted to the posts and ready for planks the next day but we were foiled by rain. I left that day after assurances the rest could be done without me.

There's a ton of work to still be done before this deck will be ready for flower pots and stain, like removing the old deck and picking out all the rubbish that was tossed under the old deck.
We found a fork, a submarine and other toys, cement blocks, rocks, and general trash. Bunny and I went to Art school together and we both have the imagination to look at the scary state the front it currently is in and see a cute deck with planters on both sides, specimen trees and beautiful plants along a welcoming rounded path to the front door. The reality is it might take a couple of years (for the landscaping) but imagination is a serious motivator.

There are many good books on deck building, giving spacing for joists and posts and beams depending on the wood available locally -yellow pine, doug fir, etc- I highly suggest using one as a reference if building a deck. The first deck Wino and I built was at ground level but I still used 4 different books as reference.

Thursday, April 1, 2010

Fowl Days are Ahead

Here's how to convince your spouse to let you get chickens (without threatening your relationship). Start by saying "I would love to get some goats. Just a few, maybe the angora ones. We could milk them, make cheese, shave them and sell the wool. The dogs would love having goats to play with. No? No goats? Peacocks would be fun then! They're big, very loud, and a bit cranky but I could collect their feathers and wouldn't that be cool? Free-range peacocks? No? No peacocks. Hmm. I guess chickens would be useful. They're sort of low maintenance and we'd have fresh eggs. Yeah? You're good with chickens? Cool!" Feel free to use the above manipulation on your own spouse.

The order is in at the farm store. Six Aracaunas, three Barred Rock and five Sal Link. The Aracaunas are the ones I really wanted and was thrilled that the local farm store was offering them. They are nicknamed 'the Easter Egg Chicken' because they lay colored eggs, anywhere from turquoise to dark olive. The birds are delivered as one to three day old chicks. In addition to the chicks I'm getting, I ordered some for my mom, plus three ducklings for her. I think there'll be 25 total chicks/ducklings on delivery.

This is the Great Chicken Experiment. For some reason, birds in general hate me. They like to bite me if I try to pet them, like in a pet store, and they will scream and cause a scene when I walk in. I had a roommate whose birds would hiss and spit at me if I sat on the couch (they ended up covered with a blanket). I don't know what it is since I am really good with other animals, especially reptiles. My mother's chickens chase me and push me around, pecking at my legs for their sunflower seeds. But I'm going to train mine early. No pecking!! I'm determined to get eggs from these chickens but they may make me pay for them in blood.

What does this all mean? It means we've got a ton of work to do getting the existing chicken coop in order. It's a bit run down, much of the trim paint gone and the doors don't exactly work. I'll be putting access doors on the outside so I can harvest
the eggs without having to go inside, which will probably smell just a bit. There's electricity inside but the GFI is tripped and won't reset, that warrants investigation. Mom thinks the nesting boxes are too high so they'll get a little access ramp. The roof just looks sad and I'm adding gutters to collect the rain water. I'm changing the exterior color, which currently matches the icky brown of the house. Wino will need to re-fence the yard with chicken wire since they can get out of the cattle wire that's there now. Phew! Deadline: late June, maybe early July. I'll pick up the chickens on May 21 and then they'll be in the dog kennel staying warm and growing for several weeks. They should be laying by fall and with 12 chickens, at one egg per day, I'll be inundated by free-range, corn fed fresh eggs. That's the plan. Want some?